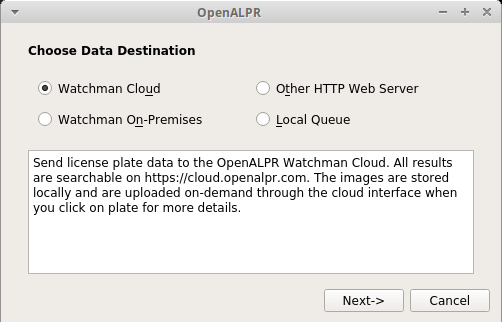
Choose your data destination and follow the appropriate steps given to you
Installation
Follow the appropriate directions for your operating system below. After completing the installation, you can choose between four data destination options depending on how you wish to use the Scout Agent.

-
Scout Cloud: Send data to https://cloud.openalpr.com (a Scout web server hosted by Rekor).
-
Scout On-Premise: Send data to an on-premise Scout web server (hosted by you on a Linux machine).
-
Other HTTP Web Server: You wish to integrate Scout with your own application. Send data to your own HTTP endpoint.
-
Local Queue: Store data locally in beanstalkd and drain the queue programmatically from your application.
If you intend to use the agent for surveillance purposes, you will most likely select Scout Cloud or Other HTTP Web Server. Options 3 and 4 are useful if you are a developer integrating Scout data into your own application.
Windows
-
Download the Rekor Scout Windows Installer.
-
Right-click the .exe file, run as administrator, and follow the install wizard.
Ubuntu Linux
Installation on Linux requires basic knowledge of using the terminal. If you do not already have Linux installed as an operating system, please complete these steps before continuing:
-
Download the Ubuntu 20.04 64-bit install image and copy it to a bootable flash drive.
-
Follow this installation guide.
If you already have Linux installed:
-
Open a new terminal
-
Ensure you have curl installed by running the following command from the terminal:
sudo apt-get update && sudo apt-get install -y curl
-
Run our installer script and choose install_agent
sudo apt update && sudo apt install -y curl
bash <(curl -s https://deb.openalpr.com/install) # select "install_agent" -
Select yes/no when prompted to connect the Agent to your cloud account
-
If you are using a GUI, you can configure the agent using the alprdconfig utility by running the following command:
-
If your server does not have a GUI and you wish to connect your software to a Scout web server, do the following:
-
alprlink-register -w https://[ip_address_of_web_server]
-
Enter the e-mail address and password for your Scout Cloud account, or the one you used when installing the on-premise webserver.
-
Docker
- Open a new terminal
- Pull the latest OpenALPR Docker image
docker pull openalpr/agent:4.1.103. Enable the license for the agent
docker run -P -v openalpr-vol1-config:/etc/openalpr/ -v openalpr-vol1-images:/var/lib/openalpr/ -it openalpr/agent openalpr-licenseregister
4. Configure it to point to a Scout web server (default is https://cloud.openalpr.com)
docker run -P -v openalpr-vol1-config:/etc/openalpr/ -v openalpr-vol1-images:/var/lib/openalpr/ -it openalpr/agent alprlink-register
5. Start the container
docker run --restart always -d --cap-add SYS_NICE -P -v openalpr-vol1-config:/etc/openalpr/ -v openalpr-vol1-images:/var/lib/openalpr/ -it openalpr/agent
Jetson
The Scout Agent can be installed on NVIDIA Jetson devices such as the Nano, TX-1, and TX-2. These are excellent options for an edge device due to the power-efficient, embedded GPU. Native binaries are available for JetPack versions 4.4-4.6. The recommended package for other JetPack versions is the Jetson Docker image
-
JetPack >= 4.2.1: pull the Docker image for openalr/agent:4.1.1-jetson and follow Docker instructions above
-
JetPack 4.4.0-4.6.x : follow Linux install instructions above
- JetPack = 5.1.X: pull the Docker image
docker pull openalpr/agent:5.0.0-jetson51-sdkNote that both native and Docker installations will automatically include the additional GPU packages. Therefore, you will not need to reference the GPU acceleration section of the documentation. When installing via Docker, make sure you have NVIDIA Docker Runtime available so that the container can access the host GPU. You will also need to modify any Docker run commands.
docker run --runtime nvidia -e NVIDIA_DRIVER_CAPABILITIES=compute,video [other_flags] [image_tag] [command]