Within the Time and Place section, there are four key areas of focus:
- Location (required)
- Affected Lanes
- Time (required)
- Cameras/Nearby Cameras
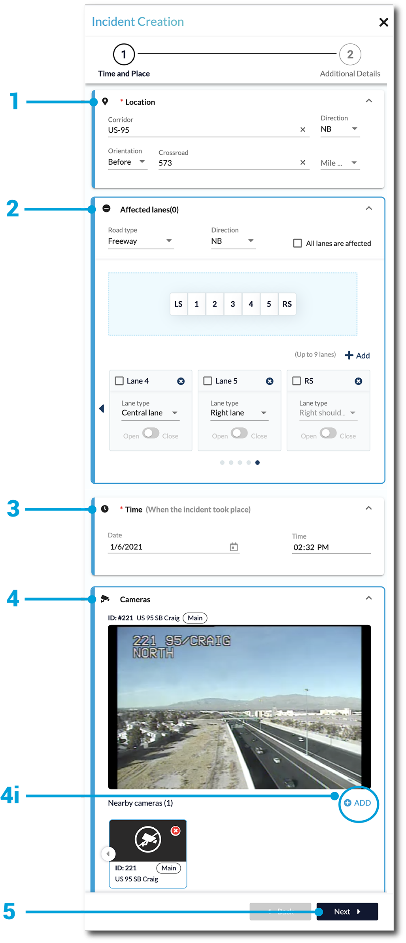
Once you have completed the Time and Place section, click the Next button to advance to the Additional Details portion of the report.
Location
The location field is mandatory. At a minimum, the corridor must be filled in - the system will automatically populate the other fields based on the location from which the incident was created. Other facts to include in your report are:
- Direction, orientation, crossroad, and mile marker are all indicators that will help response units accurately locate the incident.
- These fields can all be manually edited by users.
Affected Lanes
The Affected Lanes field is optional. Users have the ability to add details about affected lanes by doing the following:
- Select the lane direction - you can choose from ‘single direction’ or ‘multiple directions'.
- Click to highlight all lanes that were affected by the incident; the lanes are displayed from left to right.
- If desired, select a Lane type, Road type, and Direction from the dropdown menu within each of the affected lane boxes.
- Users have the option to add additional lanes by selecting the “+ add” button.
Note: You can toggle lane closures and then come back to re-open the lanes
Time
The Time field is mandatory.
Note: The Time field refers to the time the incident took place, not the time of report creation. This field will auto-populate but can be edited.
Camera
If there are cameras within 3 kilometers of the vicinity of the incident you are reporting, they will be automatically added to the report.
Users can add more cameras by doing the following:
- Type in the camera (ID or label) you would like to add - a list of matching assets will drop down for you to select from. (Screenshot)
- Click on the desired camera to add it from the dropdown list.
- With multiple camera angles available, you have the option to designate one as the main camera for the incident:
- Click on the desired camera view and select “Set as Main Camera”